Documentation/GuestOperatingSystems/Windows95: Difference between revisions
m (→Networking) |
|||
| (21 intermediate revisions by the same user not shown) | |||
| Line 1: | Line 1: | ||
= Windows 95 = | |||
== | == Installation == | ||
Windows 95 in QEMU can be both nastalgic and fun for someone who wants to remember the 90's, or use a program that only runs in this operating system. <br> | Windows 95 in QEMU can be both nastalgic and fun for someone who wants to remember the 90's, or use a program that only runs in this operating system. <br> | ||
| Line 9: | Line 9: | ||
This iso file is not bootable so you need to use a bootable floppy disk image file. This is the file I will use in this tutorial: https://winworldpc.com/product/microsoft-windows-boot-disk/95-osr2x<br> | This iso file is not bootable so you need to use a bootable floppy disk image file. This is the file I will use in this tutorial: https://winworldpc.com/product/microsoft-windows-boot-disk/95-osr2x<br> | ||
Note: the information on this page was made with QEMU 2. | Note: the information on this page was made with QEMU 2.10 in mind. If you are using a different version you might see different results. <br> | ||
Create a hard drive image file:<br> | Create a hard drive image file:<br> | ||
| Line 15: | Line 15: | ||
Installation command-line:<br> | Installation command-line:<br> | ||
qemu-system-i386 -netdev user,id=mynet0 -device ne2k_isa,netdev=mynet0 -hda win95.qcow2 -soundhw sb16 -m 64 -cpu pentium -vga cirrus -localtime -fda disk01.img -cdrom Win95_OSR25.iso -boot a -soundhw pcspk | qemu-system-i386 -netdev user,id=mynet0 -device ne2k_isa,netdev=mynet0 -hda win95.qcow2<br> -soundhw sb16 -m 64 -cpu pentium -vga cirrus -localtime -fda disk01.img<br> -cdrom Win95_OSR25.iso -boot a -soundhw pcspk | ||
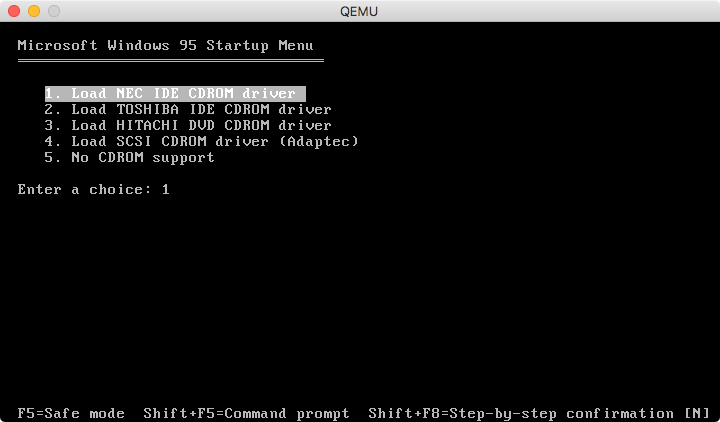
When you see this screen, push the return key. The cdrom driver will load.<br> | When you see this screen, push the return key. The cdrom driver will load.<br> | ||
| Line 72: | Line 72: | ||
Once installation has finished, you will want to remove the floppy disk and cdrom from QEMU. Then push the Finish button. <br> | Once installation has finished, you will want to remove the floppy disk and cdrom from QEMU. Then push the Finish button. <br> | ||
QEMU will reboot and Windows 95 should begin to run. <br> | QEMU will reboot and Windows 95 should begin to run. | ||
== Using == | |||
Suggested command-line: | |||
qemu-system-i386 -netdev user,id=mynet0 -device ne2k_isa,netdev=mynet0 -hda win95.qcow2<br> -soundhw sb16 -m 64 -cpu pentium -vga cirrus -localtime -boot c -soundhw pcspk | |||
If Windows 95 crashes on you consider it normal. It was unfortunately never very stable. While using it I experienced the usual blue screen of death and reboots in the middle of software installation. It will make you apreciate what we have now. | |||
== Networking == | |||
Networking will work with a few changes.<br> | |||
Right-click on "My Computer" and select properties.<br> | |||
Click on the "Device Manager" tab.<br> | |||
[[File:Device_manager.png]]<br><br> | |||
Double-click on "NE2000 Compatible".<br> | |||
Click on the Resources tab.<br> | |||
Uncheck "Use automatic settings".<br> | |||
[[File:Automatic_settings.png]]<br><br> | |||
Click on the "Change Settings..." button.<br> | |||
[[File:Change_settings.png]]<br><br> | |||
Set the Interrupt Request value to 09.<br> | |||
[[File:Interrupt_request.png]]<br><br> | |||
Click on the OK button.<br> | |||
For the first time the Copying Files window appears, enter C:\WINDOWS\SYSTEM.<br> | |||
[[File:Copying_files.png]]<br><br> | |||
For the second time the Copying Files window appears, enter C:\WINDOWS.<br> | |||
Push the Ok button. <br> | |||
Restart the VM.<br> | |||
Networking should work now.<br> | |||
[[File:Windows_95_on_the_internet.png]]<br> | |||
== Issues | == Issues == | ||
Using newer versions of the x86 processor via the "-cpu" option may lead to compatibility issues. Consider making a backup of your hard drive image file before experimenting.<br> | |||
<br> | == Software == | ||
[http://winamparchive.org/dl/?sort_by=name&sort_as=asc&dir= Winamp]<br> | |||
[http://www.oldversion.com/windows/realplayer/ Realplayer]<br> | |||
[http://www.oldapps.com/quicktime_player.php?system=Windows_95 Quicktime]<br> | |||
[http://download.cnet.com/Doom-95-demo/3001-7441_4-10000740.html?hlndr=1 Doom 95 game demo]<br> | |||
== Contact | == Contact == | ||
If you have any issues, concerns, suggestions, or anything else you wish to talk about, please [mailto:programmingkidx@gmail.com contact me]. <br> | |||
If you have any issues, concerns, suggestions, or anything else you wish to talk about, please contact me. <br> | |||
Latest revision as of 00:41, 19 January 2021
Windows 95
Installation
Windows 95 in QEMU can be both nastalgic and fun for someone who wants to remember the 90's, or use a program that only runs in this operating system.
winworldpc.com supplies many iso files for various versions of Windows 95. You can download a file here: https://winworldpc.com/product/windows-95/osr-3
This iso file is not bootable so you need to use a bootable floppy disk image file. This is the file I will use in this tutorial: https://winworldpc.com/product/microsoft-windows-boot-disk/95-osr2x
Note: the information on this page was made with QEMU 2.10 in mind. If you are using a different version you might see different results.
Create a hard drive image file:
qemu-img create -f qcow2 win95.qcow2 2G
Installation command-line:
qemu-system-i386 -netdev user,id=mynet0 -device ne2k_isa,netdev=mynet0 -hda win95.qcow2
-soundhw sb16 -m 64 -cpu pentium -vga cirrus -localtime -fda disk01.img
-cdrom Win95_OSR25.iso -boot a -soundhw pcspk
When you see this screen, push the return key. The cdrom driver will load.
At the command prompt type this: fdisk
You will then be asked if you want to enable large disk support. Enter y and push the return key.
You should see this screen. Push the return key twice. You then will be asked to reboot.
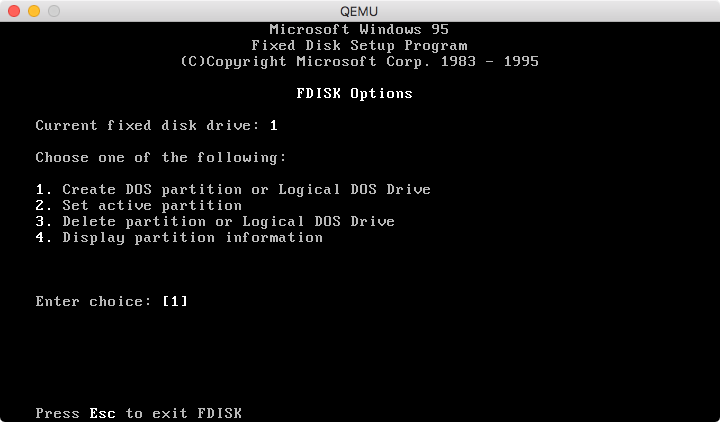
Push the Esc key then reboot QEMU.
At the floppy disk boot menu select option 1 again and push the return key.
At the command prompt type this: format c:
At the "Proceed with Format" option type y then push the return key.
The format should happen quickly. Then you will be given the option to give this volume a label. You may choose to do this or skip it.
Once at the command prompt again type this: d:setup
You should now see this message: "Setup is now going to perform a routine check on your system".
Push the return key.
You should now see this screen:
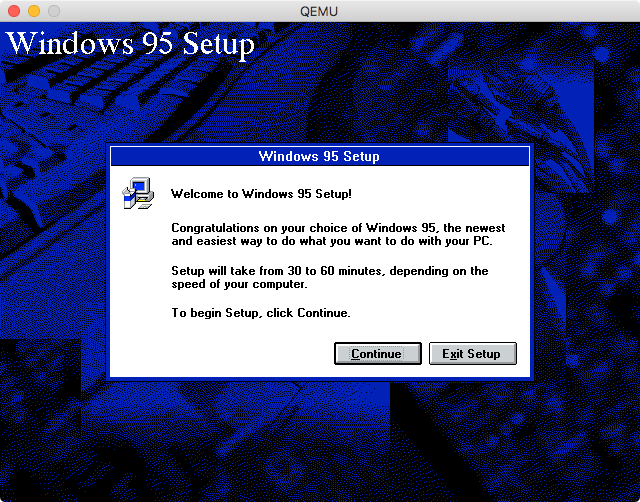
Push the Continue button.
Agree to the license agreement by pushing the Yes button.
Push the Next button at the next screen.
Select where the Windows folder should be installed and push the Next button.
At the Setup Options window push the Next button.
At the "Certificate of Authenticity" window enter the required serial number. You can find several valid numbers to enter at this page: https://forum.winworldpc.com/discussion/6677/redirect/p1
Enter your User Information at the next screen, then push the Next button.
At the "Analyzing Your Computer" screen, check all the checkboxes available. Then push the Next button.
At the "Windows Components" screen, push the Next button. Note: if you wish to customize which software is installed in your VM, then you would click the "Show me the list of components so I can choose" radio button.
Push the Next button at the "Identification" screen.
At the "Startup Disk" screen select the "No, I do not want a startup disk." radio button, then push the Next button.
Push the Next button at the "Start Copying Files" screen.
Windows will now begin to be installed. You will be seeing several windows display while Windows 95 is installed.
Once installation has finished, you will want to remove the floppy disk and cdrom from QEMU. Then push the Finish button.
QEMU will reboot and Windows 95 should begin to run.
Using
Suggested command-line:
 qemu-system-i386 -netdev user,id=mynet0 -device ne2k_isa,netdev=mynet0 -hda win95.qcow2
 -soundhw sb16 -m 64 -cpu pentium -vga cirrus -localtime -boot c -soundhw pcspk
If Windows 95 crashes on you consider it normal. It was unfortunately never very stable. While using it I experienced the usual blue screen of death and reboots in the middle of software installation. It will make you apreciate what we have now.
Networking
Networking will work with a few changes.
Right-click on "My Computer" and select properties.
Click on the "Device Manager" tab.
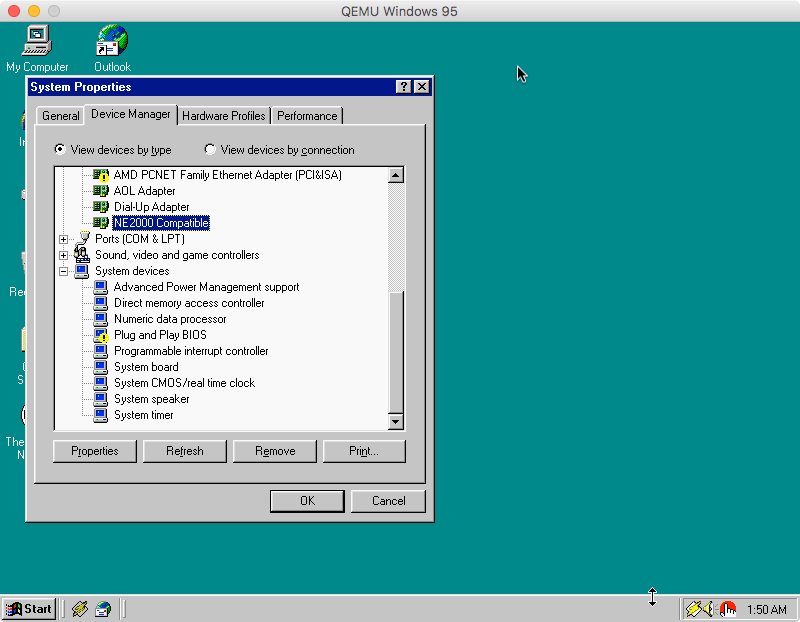
Double-click on "NE2000 Compatible".
Click on the Resources tab.
Uncheck "Use automatic settings".
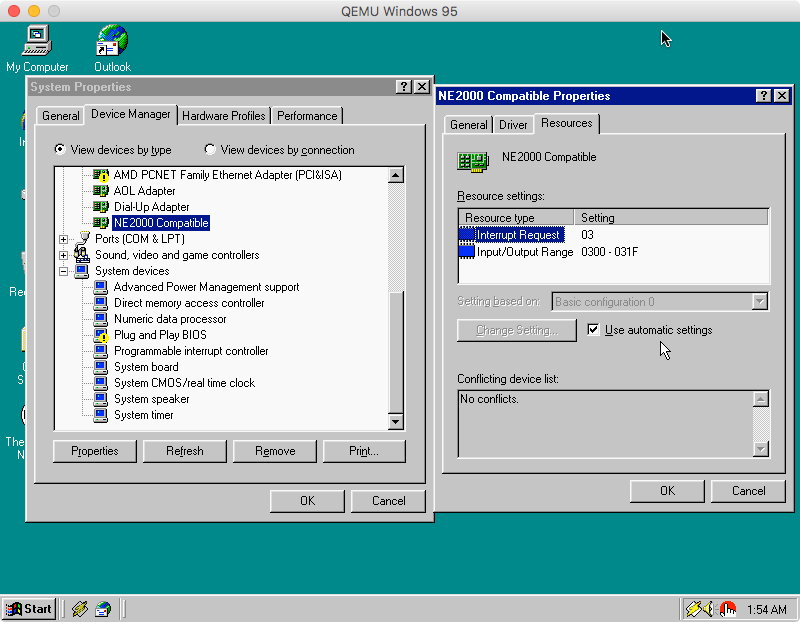
Click on the "Change Settings..." button.

Set the Interrupt Request value to 09.
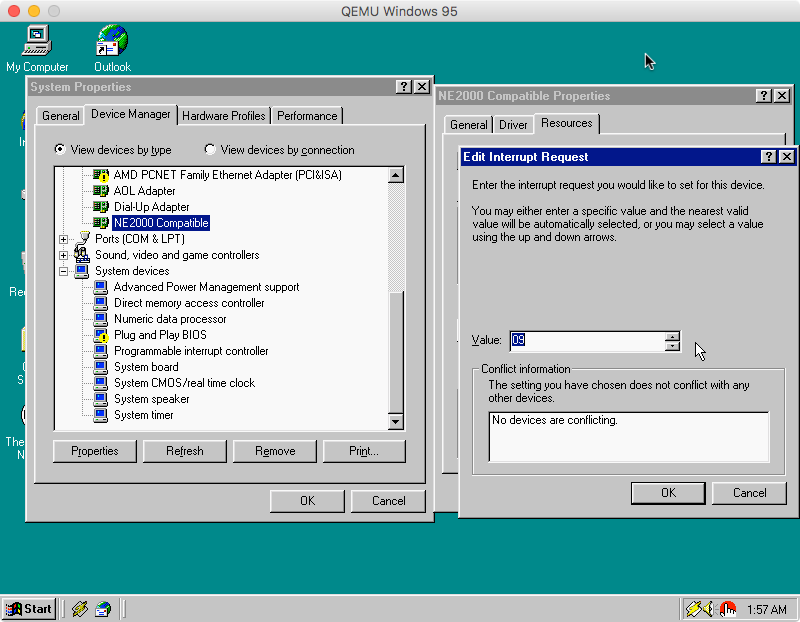
Click on the OK button.
For the first time the Copying Files window appears, enter C:\WINDOWS\SYSTEM.
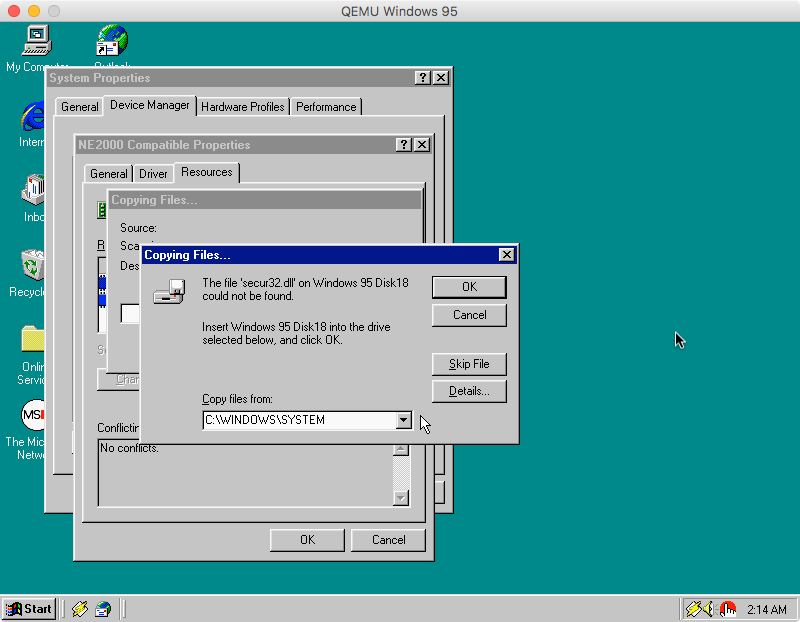
For the second time the Copying Files window appears, enter C:\WINDOWS.
Push the Ok button.
Restart the VM.
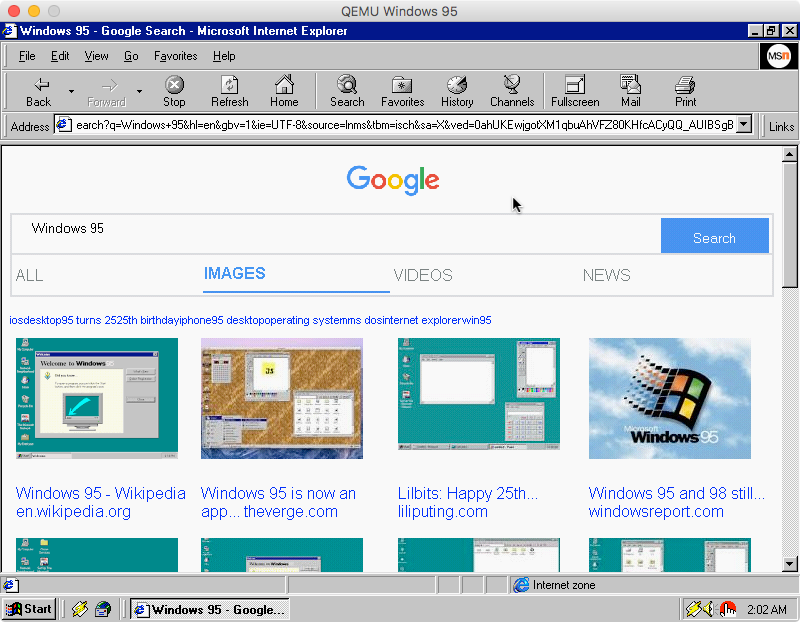
Networking should work now.
Issues
Using newer versions of the x86 processor via the "-cpu" option may lead to compatibility issues. Consider making a backup of your hard drive image file before experimenting.
Software
Winamp
Realplayer
Quicktime
Doom 95 game demo
Contact
If you have any issues, concerns, suggestions, or anything else you wish to talk about, please contact me.
