Documentation/GuestOperatingSystems/MacOS9: Difference between revisions
(Updated text to USB section) |
|||
| (7 intermediate revisions by the same user not shown) | |||
| Line 3: | Line 3: | ||
== Description == | == Description == | ||
Mac OS 9 is the last of the "classic" Mac operating systems. It was initially released in 1999 and discontinued in 2002. | Mac OS 9 is the last of the "classic" Mac operating systems. It was initially released in 1999 and discontinued in 2002. | ||
== Suggested command-line == | |||
qemu-system-ppc -hda "Mac OS 9.2 HD.qcow2" -boot c -netdev user,id=mynet0 -device sungem,netdev=mynet0 -m 512 -rtc base=localtime -M mac99,via=pmu<br> | |||
== USB flash drive access == | == USB flash drive access == | ||
Accessing a real USB flash drive from a guest like Mac OS 9 can be done in two ways. The first way is to use the flash drive as an USB flash drive on the guest. This seems the most direct way of accessing files but is really very hard to accomplish. The second way is to use the UNIX device file of the USB flash drive. This is easy to do on a Mac OS host. It will give you access to your files in the form of an ATA hard drive on the guest. The only situation this would not be ideal is when you are running a program that test an USB flash drive. It is only one use case that few people would ever have to deal with. | Accessing a real USB flash drive from a guest like Mac OS 9 can be done in two ways. The first way is to use the flash drive as an USB flash drive on the guest. This seems the most direct way of accessing files but is really very hard to accomplish. The second way is to use the UNIX device file of the USB flash drive. This is easy to do on a Mac OS host. It will give you access to your files in the form of an ATA hard drive on the guest. The only situation this would not be ideal is when you are running a program that test an USB flash drive. It is only one use case that few people would ever have to deal with. | ||
Directions | === Directions (Mac OS X and 11 hosts) === | ||
Mount USB flash drive on host.<br> | Mount USB flash drive on host.<br> | ||
Open Disk Utility.<br> | Open Disk Utility.<br> | ||
| Line 13: | Line 16: | ||
In the section called "Device:", note its name (mine was called disk4s9).<br> | In the section called "Device:", note its name (mine was called disk4s9).<br> | ||
Click on the "Unmount" button to unmount your flash drive from the host.<br> | Click on the "Unmount" button to unmount your flash drive from the host.<br> | ||
Start your Mac OS 9 VM with | [[File:Disk Utility.png | 800px]] | ||
Start your Mac OS 9 VM with these option: sudo <QEMU commands> -hdb /dev/<name minus s and everything after>.<br> | |||
So for example if your disk is called disk4s9 you would use /dev/disk4.<br> | So for example if your disk is called disk4s9 you would use /dev/disk4.<br> | ||
In the QEMU monitor you could see if the flash drive is being used by typing "info block".<br> | In the QEMU monitor you could see if the flash drive is being used by typing "info block".<br> | ||
Once you are at the Mac OS 9 desktop you might now see the flash drive mounted.<br> | Once you are at the Mac OS 9 desktop you might now see the flash drive mounted.<br><br> | ||
If you don't see it, then open "Drive Setup", select your flash drive from the list.<br> | If you don't see it, then open "Drive Setup", select your flash drive from the list.<br> | ||
[[File:select flash drive.png | 800px]] | |||
Click on the "Initialize..." button.<br> | Click on the "Initialize..." button.<br> | ||
Click on the "Custom Setup" button.<br> | Click on the "Custom Setup" button.<br> | ||
| Line 24: | Line 32: | ||
Select "Mac OS Extended" as the file system type.<br> | Select "Mac OS Extended" as the file system type.<br> | ||
Push the "OK" button.<br> | Push the "OK" button.<br> | ||
[[File:custom setup.png | 600px]] | |||
Push the Initialize button (this will erase the flash drive!)<br> | Push the Initialize button (this will erase the flash drive!)<br> | ||
The flash drive will now mount under Mac OS 9, Mac OS X, and Mac OS 11.<br> | The flash drive will now mount under Mac OS 9, Mac OS X, and Mac OS 11.<br> | ||
It is easier to treat a USB 2.0 or 3.0 flash drive as an ATA hard drive for older operating systems than using it as an USB 1.1 device. This method does not require the use of older USB 1.1 hubs or device driver unloading. | It is easier to treat a USB 2.0 or 3.0 flash drive as an ATA hard drive for older operating systems than using it as an USB 1.1 device. This method does not require the use of older USB 1.1 hubs or device driver unloading. | ||
== Links == | |||
* [https://macintoshgarden.org Macintosh garden - tons of software to download] | |||
* [https://www.emaculation.com emaculation - a place to go to meet others who are into Mac operating systems] | |||
* [https://winworldpc.com/product/mac-os-9/90 winworldpc - installers for Mac OS 9] | |||
* [https://wiki.qemu.org/Documentation/Platforms/PowerPC QEMU PowerPC emulator page] | |||
== Contact == | |||
If you have any issues or concerns with this page please feel free to [mailto:programmingkidx@gmail.com contact me]. | |||
Latest revision as of 23:04, 23 July 2021
Mac OS 9 (9.0, 9.1, 9.2)
Description
Mac OS 9 is the last of the "classic" Mac operating systems. It was initially released in 1999 and discontinued in 2002.
Suggested command-line
qemu-system-ppc -hda "Mac OS 9.2 HD.qcow2" -boot c -netdev user,id=mynet0 -device sungem,netdev=mynet0 -m 512 -rtc base=localtime -M mac99,via=pmu
USB flash drive access
Accessing a real USB flash drive from a guest like Mac OS 9 can be done in two ways. The first way is to use the flash drive as an USB flash drive on the guest. This seems the most direct way of accessing files but is really very hard to accomplish. The second way is to use the UNIX device file of the USB flash drive. This is easy to do on a Mac OS host. It will give you access to your files in the form of an ATA hard drive on the guest. The only situation this would not be ideal is when you are running a program that test an USB flash drive. It is only one use case that few people would ever have to deal with.
Directions (Mac OS X and 11 hosts)
Mount USB flash drive on host.
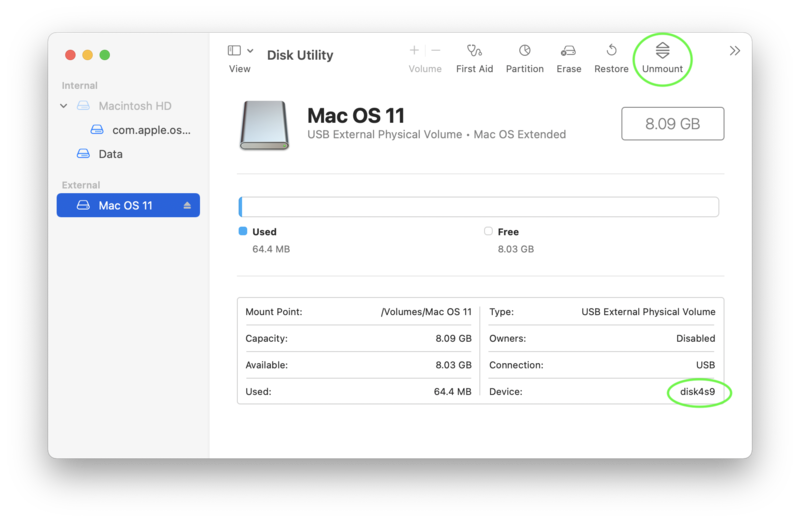
Open Disk Utility.
Click on the USB flash drive.
In the section called "Device:", note its name (mine was called disk4s9).
Click on the "Unmount" button to unmount your flash drive from the host.

Start your Mac OS 9 VM with these option: sudo <QEMU commands> -hdb /dev/<name minus s and everything after>.
So for example if your disk is called disk4s9 you would use /dev/disk4.
In the QEMU monitor you could see if the flash drive is being used by typing "info block".
Once you are at the Mac OS 9 desktop you might now see the flash drive mounted.
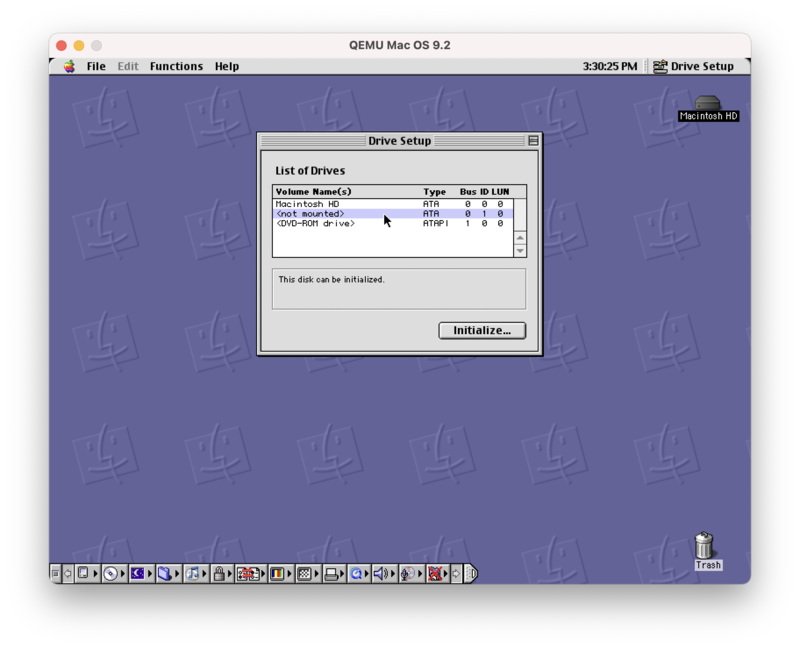
If you don't see it, then open "Drive Setup", select your flash drive from the list.

Click on the "Initialize..." button.
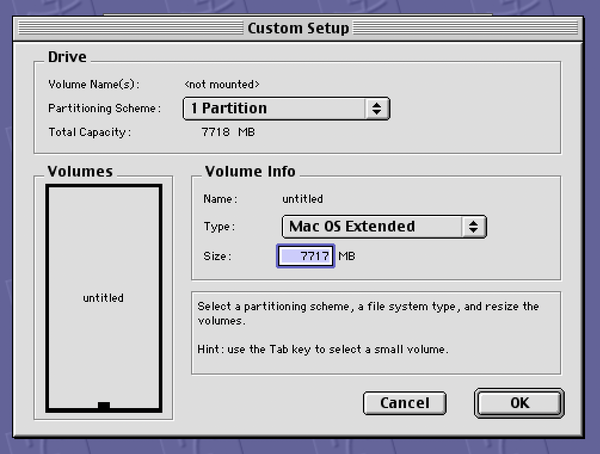
Click on the "Custom Setup" button.
Select "1 Partition".
Select "Mac OS Extended" as the file system type.
Push the "OK" button.

Push the Initialize button (this will erase the flash drive!)
The flash drive will now mount under Mac OS 9, Mac OS X, and Mac OS 11.
It is easier to treat a USB 2.0 or 3.0 flash drive as an ATA hard drive for older operating systems than using it as an USB 1.1 device. This method does not require the use of older USB 1.1 hubs or device driver unloading.
Links
- Macintosh garden - tons of software to download
- emaculation - a place to go to meet others who are into Mac operating systems
- winworldpc - installers for Mac OS 9
- QEMU PowerPC emulator page
Contact
If you have any issues or concerns with this page please feel free to contact me.
